Stephania Erecta Care Guide - How to Take Your Plant from “Potato” to Perfection
 Stephania Erecta: @RootedHues. Some of the links in this post may be affiliate links.
Nothing says “trendy” quite like a plant that looks like a fat potato.
Over the past few years, the relatively rare Stephania erecta plant has exploded in popularity due to the fact that a) it really does look like a potato and b) it is moderately easy to care for. This houseplant is unique and endearing to plant growers of all skill levels because it starts off looking like something grubby and sad, but then grows into something quite beautiful (which is what we all wish for ourselves, right?).
Here’s a look at how to care for your Stephania erecta, so that it can become the best potato — ehem, I mean, plant — it can be.
Stephania Erecta at a Glance
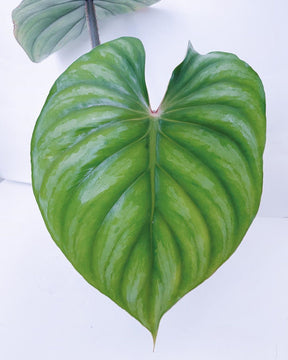
The Stephania erecta, also known as Stephania pierrei, hails from Thailand and is characterized by a large, woody bulb known as a caudex (this is the potato part) from which sprout multiple tall, slender, straight stalks (the “erecta” part). These stalks are topped by shield-shaped green leaves whose whimsical arrangement make this an attractive and intriguing plant for any indoor garden.
Growth & Size
The Stephania erecta can vary in size, but on average it reaches around three feet in height. This growth takes place slowly, with some plants taking 20 years to reach full maturity.
The Stephania’s caudex typically has a width of between six and seven inches. The leaves tend to be around two inches in diameter, making for delightful little bunches that look like the little umbrellas they put in drinks at tiki bars.
Soil
Stephania erecta care, like with any plant, begins from the ground up. Choosing what soil to use can greatly affect how well this plant grows (or if it even grows at all). Since the caudex naturally helps the plant’s roots to maintain moisture, you don’t need to get a super loamy, water-retaining soil.
Instead, opt for a sand-based potting mix that is labeled for use for cacti and succulents, such as this, and mix it with perlite and reptibark.
Potting
When it comes to potting your Stephania erecta, be sure to choose a pot with drainage holes in the bottom.
Steps to Pot:
- “Wake up” your Stephania erecta by letting the caudex soak in warm water for 24 hours, with the little spot where the stalks will grow (the node) facing up.
- Some start by putting a thin layer of rocks in the bottom of the pot to aid drainage, but others just go ahead and fill the pot 2/3rds of the way full of soil.
- Place the caudex on the top of the soil (don’t bury it).
- Fill in the space between the caudex and the pot with more soil (again, don’t cover the bulb on top).
- Give it some water and voila! Your plant has been potted.
🌱 How to Make It Sprout Once It’s Potted
This is a question that many Stephania erecta owners have. When you buy it, the plant is usually still in it’s “potato” form: no leaves, no stems, no roots, just a bulb.
To make the caudex sprout those tall, elegant green stems, the key is humidity. Similar to making seeds sprout, you can put the potted caudex inside a germination dome, which you can make yourself. Simply make sure the soil in your pot is damp (but not so wet that it’s dripping or drowning the plant), then place a plastic bag over the top of it to hold in the moisture.
Keep the caudex in a warm place (between 77 and 80 degrees Fahrenheit) where it can receive bright but indirect sunlight.
The time it takes to sprout will vary, but it can take anywhere from one week to one month.
If you notice the top of the caudex is getting too dry, you can spritz it with water from a spray bottle, but take care not to overwater. And if you are really a gardening pro and want to speed things up even more, you can add some Alpha Naphthalene Acetic Acid (ANAA), a growth hormone, and vitamin B1 to the water you add to the soil to stimulate growth.Repotting
After around three years, the now-sprouted, now-green and leafy Stephania erecta will need to be repotted. When doing so, be careful to keep the original soil around the roots to reduce the risk of transplant shock, which can be fatal.
Otherwise, the process is much the same as the original potting: add around an inch of soil to the new pot and rest the caudex/roots on top. Then, simply add more soil to fill in the gap between the plant and the side of the pot, filling it around 3/4ths of the way full.
Watering
It is extremely easy to overwater the Stephania erecta. The caudex holds moisture, so it’s best to let the soil dry out almost entirely before watering. In the winter, the plant goes dormant and hardly needs any water at all, so try to resist the urge to water it more than once a month!
Light
Like most other houseplants, this one likes bright locations with indirect sunlight.
If your Stephania Erecta is not getting enough light, its stems will stretch and become leggy. You may want to use an artificial grow light to provide sufficient lighting.
Temperature
Stephania erecta, like most human beings, is most comfortable at a temperature between 61 and 79 degrees Fahrenheit.
Humidity
To avoid brown, dry, crispy leaves, keep the humidity level of your plant at 60 percent or higher. Give the leaves a spritz of water from a spray bottle from time to time, or construct a humidity tray if your house is particularly dry.
Fertilizing
Fertilizer isn’t a necessary facet of Stephania erecta care in most cases. In fact, over-fertilizing can cause a build-up of substances that can be harmful to your plant, so unless you want to add just a bit of fertilizer every few months, it is best to just let it be.
Pruning
If your plant starts to get yellow leaves, simply snip them off with a pair of clean, sterile scissors. We like to use these pruning shears.
Propagation
Stephania erecta can be propagated with seeds. Soak them for 24 hours in a dark, warm place, then plant them around 0.2 inches deep in the same cactus soil you used for the adult plant. Place their tray inside a plastic bag to create a sort of greenhouse, and maintain a temperature of around 64 degrees Fahrenheit until the seeds sprout, which can take up to five months. Keep in a location with bright but indirect sunlight, and remove the bag and repot the seedlings when they have grown two leaves.
Pests & Problems
Stephania erecta’s biggest enemy is root rot, which is brought on by too much moisture. Leaf spot disease is also possible (and also brought on by too much water on the leaves), as is mildew.
When it comes to pests, be on the lookout for tiny ones like aphids, spider mites, mealybugs, thrips, and whiteflies.
We prefer Captain Jack's Dead Bug Brew as our go-to solution for pest control. Just mix the concentrated formula with water and spray generously on the leaves. This can be repeated on a monthly basis for effective pest management.
Is My Stephania Erecta Dead?
In the winter, your plant may start to look dead… but it’s probably not! This specimen, like many of the trees outside, is deciduous, meaning that it drops its leaves in the fall and enters a state of dormancy. This period is necessary for the plant to recover from all the growing it did during the rest of the year, and typically lasts the length of winter.
Just keep your Stephania erecta in a warm and airy, not overly humid place, and water it lightly whenever the soil’s dry. When spring comes, put it in a warmer environment and give it a good watering, and its greenery should come back bigger and better than ever.
A Feast for the Eyes, Not the Stomach
Just a quick note: unlike a real potato, this plant is classified as toxic, so you probably shouldn’t try eating it.
Written byJessica Scott